
I didn't grow up dying Easter eggs; I was busy reminiscing about how my people left Egypt in a hurry. But when I married my husband I embraced all the new holidays we celebrate together, and Easter is among my favorites. I got into the whole pastel, chocolate and egg festivities quickly. Each year I host a big brunch and set up an egg hunt for the kids. But what I did not get around to until late was the mess that is dying Easter eggs. It always seemed unnecessary and a waste of perfectly good eggs (I am not personally into eating eggs that have been soaked in dye, but I know many people do).
For my daughter's sake I wanted to do a fun Easter egg project together for our Easter brunch last year. Luckily I found an easy way to tackle egg dying without a huge mess, thanks to my friend Jessica. Jessica had seen a DIY kit on Etsy for dying Easter eggs with scraps of patterned silk fabric, so she brought me a bag filled with a dozen silk fabric scraps, a dozen pieces of muslin and twist ties. The idea for dying eggs with the colors from silk scraps is apparently from Germany, and was featured on the Martha Stewart Show several years back (see Martha's original video tutorial on
Egg Dying with Silk Fabrics) and the link for the
step-by-step instructions, summarized below with a few of my tips). While you can easily tear apart your husband's patterned silk ties (be sure to remove the lining!), your silk blouses destined for goodwill or hit your local thrift store for some silk pieces to scrap, several crafties on Etsy are making and selling easy
DIY silk dye Easter egg kits with all the necessary supplies.
The process is basically this:
(1) Wrap raw white eggs in pieces of silk big enough to cover the egg with the patterned side of the fabric facing the eggshell and secure around the egg with a twist tie.
Tip: if you want the exact pattern of the fabric to be on the eggs wet the silk and smooth it around the egg so at least one side has a flat portion of the pattern on it. If you want a more swirly, tie-dye look like the ones we made (pictured in this post), use dry silk pieces and wrap them imprecisely around the eggs. I opted for the second (dry fabric) method since it seemed easier to do with a kid (my daughter was able to wrap them herself when she was 3, but she did need some assistance with the twist tie).
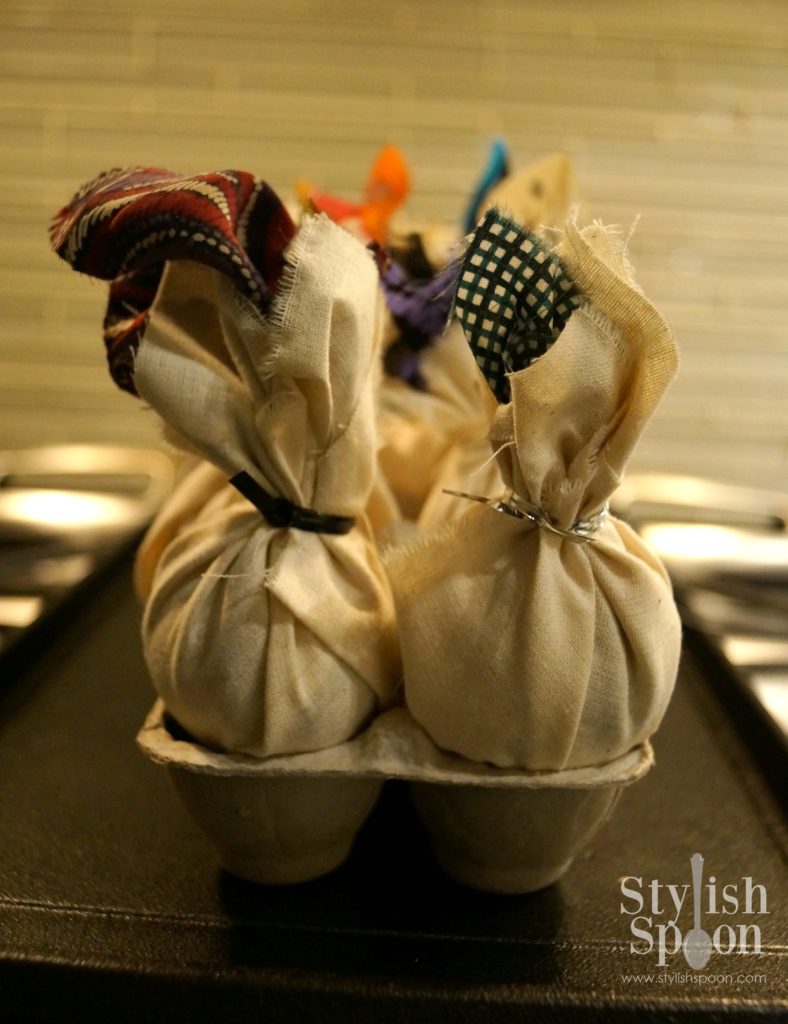
(2) After each egg is wrapped with silk, wrap a scrap of muslin or white cotton around the silk-wrapped egg and secure it around the egg with another twist tie. The muslin or cotton keeps the color of the dye on the egg and prevents the dye from bleeding into the water. You can use an old sheet or pillowcase to make the
(3) The next step is to boil the eggs in a non-reactive pot (glass or ceramic - I used my Le Creuset cast iron dutch oven) with about 3 tablespoons of white vinegar for at least 20 minutes (or as many as 40 minutes but 20 minutes is suggested if you would like to eat the eggs).
(4) Finally, remove the eggs from the pot with tongs and let them cool. Carefully unwrap once eggs are fully cooled.

It was really fun to unwrap each eggs with my daughter. We didn't know how they would come out, or which pattern we would reveal. They all came out swirled with pretty pink and purple colors, though none of them really had the exact pattern of the silk on them since we wrapped them loosely.
Note that we did lose an eggs in the unwrapping process, as I let my daughter help with the wrapping and unwrapping and one slipped from her little hands. Make a few extra if you plan to do this with small children and need a specific amount for your project.
 I highly recommend this silk dye Easter egg project to anyone who wants real dyed eggs without the mess of actual dye. I would not, however, recommend eating the dyed eggs. I suspect the dyes used on silk fabrics are not food safe.


 I didn't grow up dying Easter eggs; I was busy reminiscing about how my people left Egypt in a hurry. But when I married my husband I embraced all the new holidays we celebrate together, and Easter is among my favorites. I got into the whole pastel, chocolate and egg festivities quickly. Each year I host a big brunch and set up an egg hunt for the kids. But what I did not get around to until late was the mess that is dying Easter eggs. It always seemed unnecessary and a waste of perfectly good eggs (I am not personally into eating eggs that have been soaked in dye, but I know many people do).
For my daughter's sake I wanted to do a fun Easter egg project together for our Easter brunch last year. Luckily I found an easy way to tackle egg dying without a huge mess, thanks to my friend Jessica. Jessica had seen a DIY kit on Etsy for dying Easter eggs with scraps of patterned silk fabric, so she brought me a bag filled with a dozen silk fabric scraps, a dozen pieces of muslin and twist ties. The idea for dying eggs with the colors from silk scraps is apparently from Germany, and was featured on the Martha Stewart Show several years back (see Martha's original video tutorial on Egg Dying with Silk Fabrics) and the link for the step-by-step instructions, summarized below with a few of my tips). While you can easily tear apart your husband's patterned silk ties (be sure to remove the lining!), your silk blouses destined for goodwill or hit your local thrift store for some silk pieces to scrap, several crafties on Etsy are making and selling easy DIY silk dye Easter egg kits with all the necessary supplies.
I didn't grow up dying Easter eggs; I was busy reminiscing about how my people left Egypt in a hurry. But when I married my husband I embraced all the new holidays we celebrate together, and Easter is among my favorites. I got into the whole pastel, chocolate and egg festivities quickly. Each year I host a big brunch and set up an egg hunt for the kids. But what I did not get around to until late was the mess that is dying Easter eggs. It always seemed unnecessary and a waste of perfectly good eggs (I am not personally into eating eggs that have been soaked in dye, but I know many people do).
For my daughter's sake I wanted to do a fun Easter egg project together for our Easter brunch last year. Luckily I found an easy way to tackle egg dying without a huge mess, thanks to my friend Jessica. Jessica had seen a DIY kit on Etsy for dying Easter eggs with scraps of patterned silk fabric, so she brought me a bag filled with a dozen silk fabric scraps, a dozen pieces of muslin and twist ties. The idea for dying eggs with the colors from silk scraps is apparently from Germany, and was featured on the Martha Stewart Show several years back (see Martha's original video tutorial on Egg Dying with Silk Fabrics) and the link for the step-by-step instructions, summarized below with a few of my tips). While you can easily tear apart your husband's patterned silk ties (be sure to remove the lining!), your silk blouses destined for goodwill or hit your local thrift store for some silk pieces to scrap, several crafties on Etsy are making and selling easy DIY silk dye Easter egg kits with all the necessary supplies.
 The process is basically this:
(1) Wrap raw white eggs in pieces of silk big enough to cover the egg with the patterned side of the fabric facing the eggshell and secure around the egg with a twist tie.
Tip: if you want the exact pattern of the fabric to be on the eggs wet the silk and smooth it around the egg so at least one side has a flat portion of the pattern on it. If you want a more swirly, tie-dye look like the ones we made (pictured in this post), use dry silk pieces and wrap them imprecisely around the eggs. I opted for the second (dry fabric) method since it seemed easier to do with a kid (my daughter was able to wrap them herself when she was 3, but she did need some assistance with the twist tie).
(2) After each egg is wrapped with silk, wrap a scrap of muslin or white cotton around the silk-wrapped egg and secure it around the egg with another twist tie. The muslin or cotton keeps the color of the dye on the egg and prevents the dye from bleeding into the water. You can use an old sheet or pillowcase to make the
(3) The next step is to boil the eggs in a non-reactive pot (glass or ceramic - I used my Le Creuset cast iron dutch oven) with about 3 tablespoons of white vinegar for at least 20 minutes (or as many as 40 minutes but 20 minutes is suggested if you would like to eat the eggs).
(4) Finally, remove the eggs from the pot with tongs and let them cool. Carefully unwrap once eggs are fully cooled.
The process is basically this:
(1) Wrap raw white eggs in pieces of silk big enough to cover the egg with the patterned side of the fabric facing the eggshell and secure around the egg with a twist tie.
Tip: if you want the exact pattern of the fabric to be on the eggs wet the silk and smooth it around the egg so at least one side has a flat portion of the pattern on it. If you want a more swirly, tie-dye look like the ones we made (pictured in this post), use dry silk pieces and wrap them imprecisely around the eggs. I opted for the second (dry fabric) method since it seemed easier to do with a kid (my daughter was able to wrap them herself when she was 3, but she did need some assistance with the twist tie).
(2) After each egg is wrapped with silk, wrap a scrap of muslin or white cotton around the silk-wrapped egg and secure it around the egg with another twist tie. The muslin or cotton keeps the color of the dye on the egg and prevents the dye from bleeding into the water. You can use an old sheet or pillowcase to make the
(3) The next step is to boil the eggs in a non-reactive pot (glass or ceramic - I used my Le Creuset cast iron dutch oven) with about 3 tablespoons of white vinegar for at least 20 minutes (or as many as 40 minutes but 20 minutes is suggested if you would like to eat the eggs).
(4) Finally, remove the eggs from the pot with tongs and let them cool. Carefully unwrap once eggs are fully cooled.
 It was really fun to unwrap each eggs with my daughter. We didn't know how they would come out, or which pattern we would reveal. They all came out swirled with pretty pink and purple colors, though none of them really had the exact pattern of the silk on them since we wrapped them loosely.
 I highly recommend this silk dye Easter egg project to anyone who wants real dyed eggs without the mess of actual dye. I would not, however, recommend eating the dyed eggs. I suspect the dyes used on silk fabrics are not food safe.